
How to Become a Pinterest Verified Merchant with Squarespace
Pinterest’s Verified Merchant Program (VMP) is a way to recognize trusted businesses, giving them a special badge and increased visibility.
This guide walks you through the requirements and steps to apply as a Squarespace store.
Eligibility Requirements
Before you begin the application, ensure you meet the following:
Pinterest Account: Your account must be a minimum of three months old.
Website: Your business website must be claimed (see below) on Pinterest and at least 13 months old.
Profile: Your Pinterest profile must have a profile picture and completed "About" section.
Merchant Guidelines: Your products and website must adhere to Pinterest's Merchant Guidelines.

Preliminary Steps
Before you can apply for the Verified Merchant Program, you need to complete a few preliminary steps. These steps are necessary to set up your Pinterest business account and verify your website.
Step 1: Convert Personal Pinterest Account to a Business Account

Click the drop-down arrow in the upper right corner of Pinterest.
Select Settings.
Select Account Settings.
Scroll down to Account Changes.
Select Convert Account.
Double-check that the email address is the one associated with your Pinterest personal account.
Click Continue.
Step 2: Verify your Website with Pinterest

Log in to your Pinterest business account.
Click the directional chevron down icon in the top-right corner to open your menu.
Select Settings.
Click Claimed accounts from the left-side navigation.
Click Claim next to Websites.
Click the text in the box below Add HTML tag to copy it.
Click Continue.
In a separate window, log in to your website.
Go to pages > Website Tools > Code Injection > Header and Paste the HTML Tag.
Return to Pinterest and enter your website URL in the text box.
Click Verify.
Now that you've completed the preliminary steps, you're ready to begin the application process. These steps involve connecting your product catalog, setting up conversion tracking, and ensuring that your tracking system sends the necessary data.
Become a Verified Merchant

Step 1: Connect Catalog
Connecting your product catalog to Pinterest is essential for creating Product Pins, which display important information about your products, such as price and availability. Here's how to connect your catalog:
Export your products from Squarespace.
Upload the CSV Below
Upload the CSV file you exported from Squarespace
Enter your domain (e.g., https://yourdomain.com).
Enter the country currency (e.g., USD).
Enter the appropriate Google Product Category for your products (you can find it here).
Go to Pinterest and upload your data source manually:
Log in to your Pinterest business account from your desktop.
Click the hamburger icon at the top-left of the page.
Under Business, click Catalogs and product groups.
Click Add data source.
Click the Upload manually tab.
Fill in the details for your data source (name, country/region, language, default currency).
Click Choose a file to select your data source from your desktop, or drag and drop your data source into the box.
Click Upload data source.
Step 2: Set Up Conversion Tracking
Choose one of these methods to track customer actions on your website. Option 1. Manual pinterest tagging or Option 2. Google Tag Manager.
Option 1: Pinterest Tag
Add the following code to the sitewide code injection:
The base code is required for conversion tracking. Change the part of the code below that says CHANGE-ME to your unique tag ID ID which can be found here:
It's generated in the Conversion Tag Manager (link requires login), and it contains your unique tag ID.

Go to Pages > Website tools > Code Injection > Header.
EXAMPLE BASE CODE

<!-- Pinterest Tag -->
<script>
!function(e){if(!window.pintrk){window.pintrk = function () {
window.pintrk.queue.push(Array.prototype.slice.call(arguments))};var
  n=window.pintrk;n.queue=[],n.version="3.0";var
  t=document.createElement("script");t.async=!0,t.src=e;var
  r=document.getElementsByTagName("script")[0];
  r.parentNode.insertBefore(t,r)}}("https://s.pinimg.com/ct/core.js");
pintrk('load', 'CHANGE-ME', {em: '{customerEmailAddress}'});
pintrk('page');
pintrk('track', 'pagevisit');

</script>
<noscript>
<img height="1" width="1" style="display:none;" alt=""
  src="https://ct.pinterest.com/v3/?event=init&tid=CHANGE-ME&pd[em]=<hashed_email_address>&noscript=1" />
</noscript>
<!-- end Pinterest Tag -->
Add the checkout code to the code injection order confirmation/status page:
<script>
pintrk('track', 'checkout',{
value: {orderGrandTotal},
order_quantity:1,
currency: 'USD'
});
</script>

<noscript>
<img height="1" width="1" style="display:none;" alt=""
src="https://ct.pinterest.com/v3/?tid=CHANGE-ME&event=checkout&noscript=1"/>
</noscript>
Add the "Add to Cart" event code to your shop page advanced code injection:
<!-- Pinterest Pixel - Tracking clicks on Buttons -->
<script>
  function ptTrackingClicks() {
    // Add to Cart
    var cartButton = document.querySelector('.sqs-add-to-cart-button');
    if (cartButton) {
      cartButton.addEventListener('click', function() {
        var productVariants = document.querySelector('.product-variants');
        if (productVariants) {
          var variantsData = productVariants.getAttribute('data-variants');
          if (variantsData) {
            var variants = JSON.parse(variantsData);
            if (variants && variants.length > 0) {
              var sku = variants[0].sku; // Assuming the SKU is associated with the first variant
              if (sku) {
                pintrk('track', 'AddToCart', {
                  product_id: sku // Use the SKU as the product ID
                });
              }
            }
          }
        }
      }, false);
    }
  }

  document.addEventListener('DOMContentLoaded', ptTrackingClicks);
</script>
<!-- end Pinterest Pixel - Tracking clicks on Buttons -->
Option 2: Google Tag Manager (Pending)
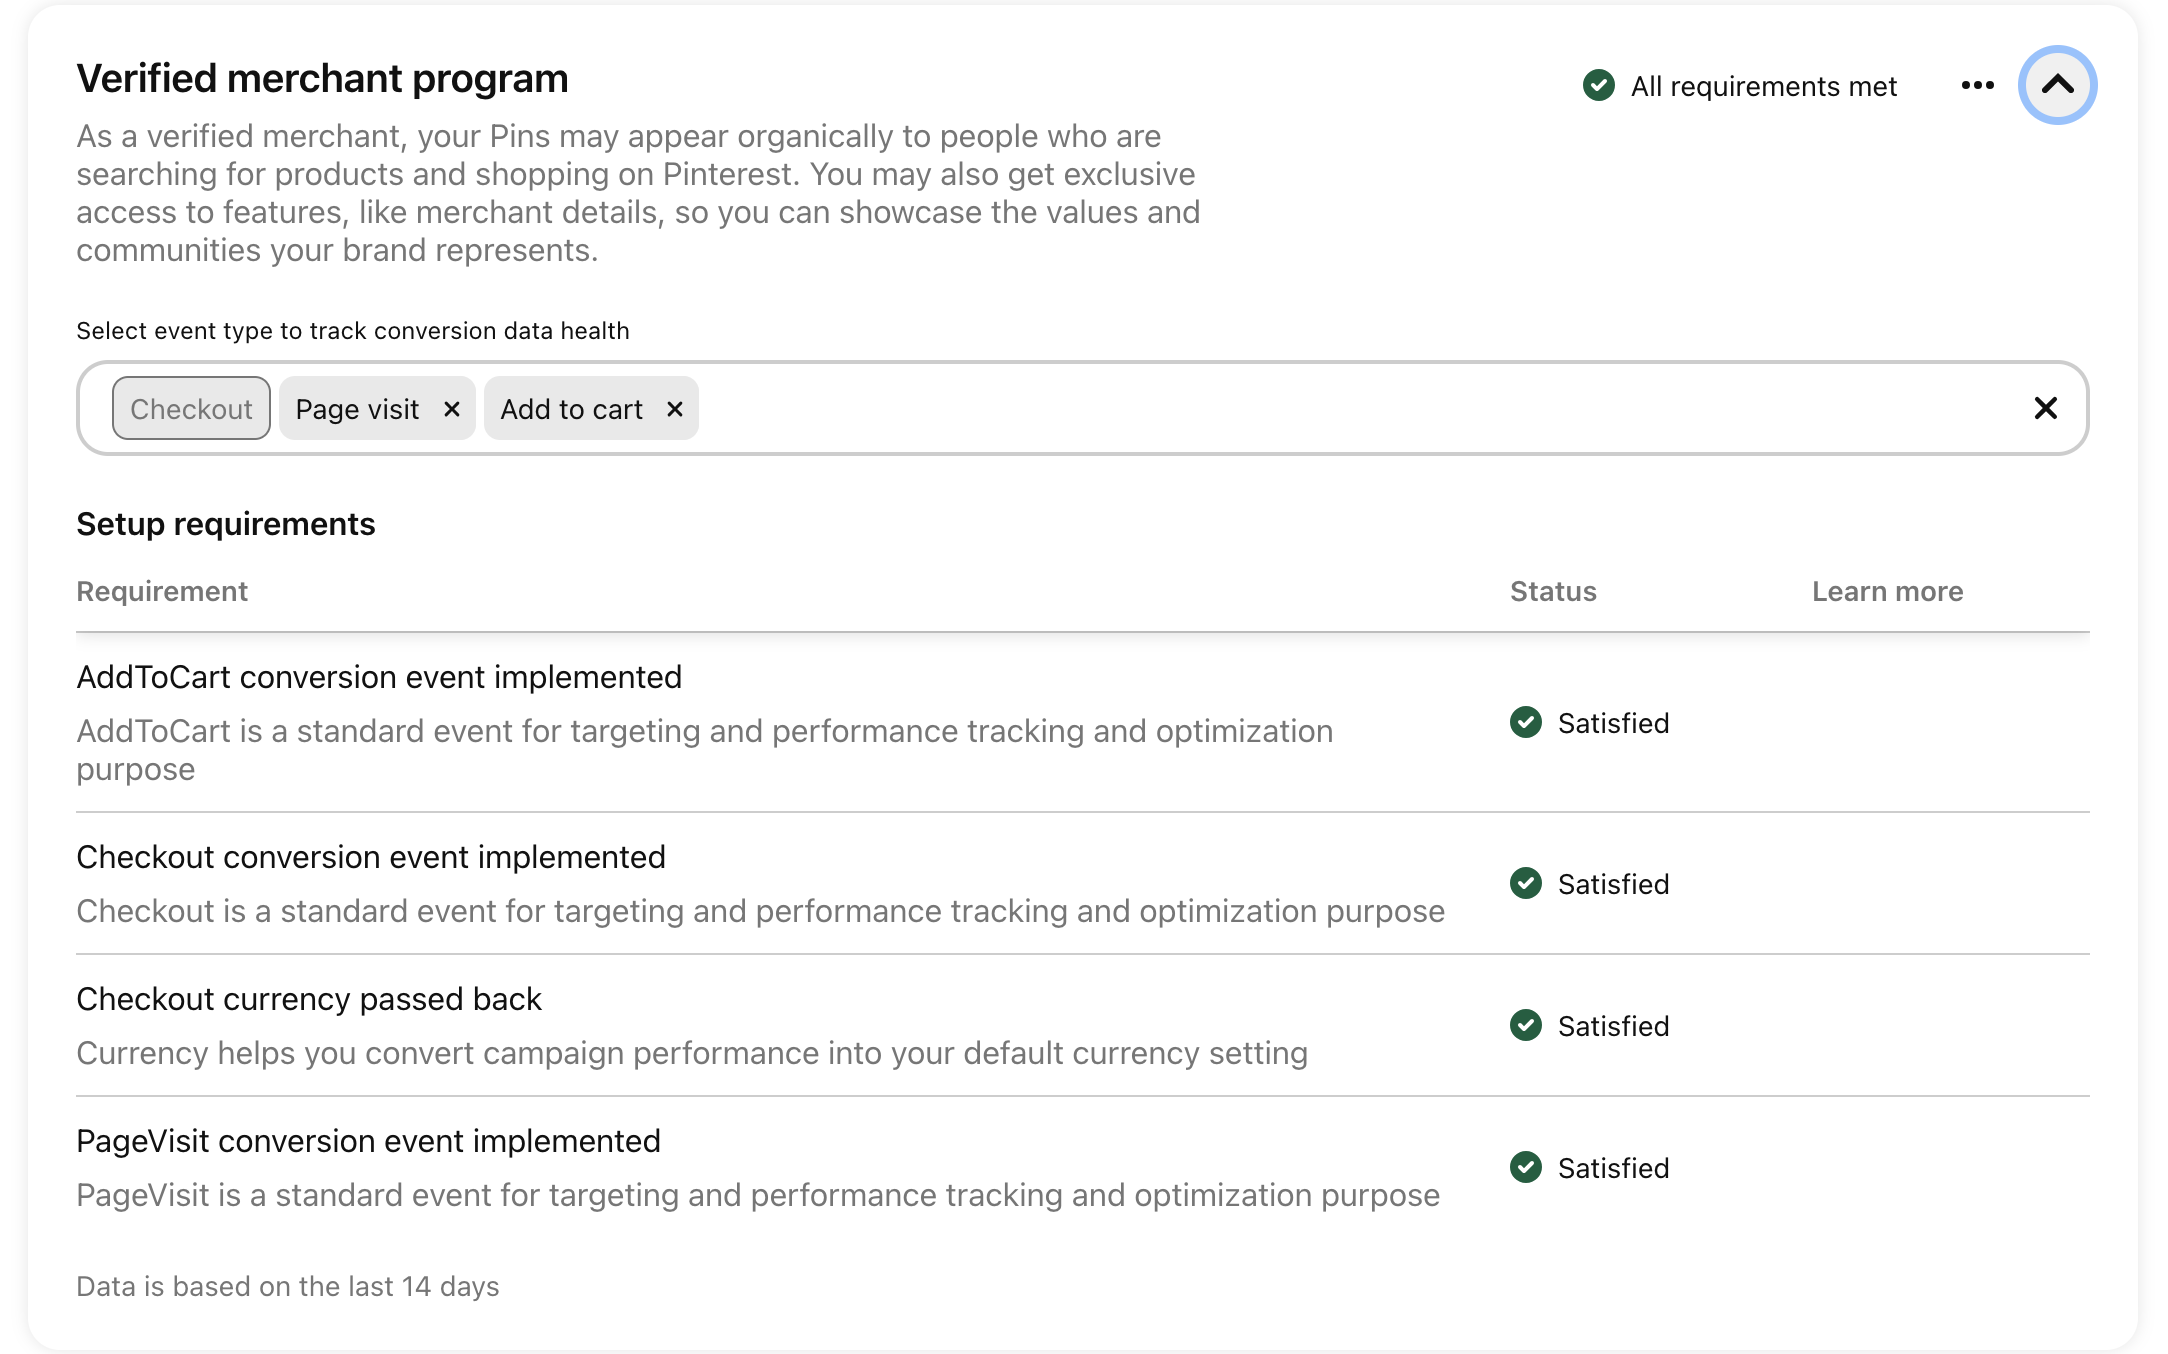
Step 3: Ensure Conversion Data
Within the last 30 days, your tracking system must have sent the following events (with checkout events including currency):
At least one 'Page Visit'
At least one 'Add to Cart'
At least one 'Checkout'
To make sure this happens, create a dummy order by creating a 100% off discount code and buying something from your shop.
In Pinterest go to Conversions > Events Overview to make sure it registered.
Take a look at an overview of event activity on your website.
Important Notes
If you don't meet the eligibility requirements, you won't be able to join the VMP.
Pinterest reviews your products and website after you upload your catalog. You'll be notified if you don't comply with the Merchant Guidelines, and you have the option to appeal the decision.
How to Apply Directly
Use this link to directly apply for the Verified Merchant Program: Apply to the Verified Merchant Program

